Recurring Detection — Auto-Find Subscriptions
Overview
Section titled “Overview”Recurring detection identifies subscriptions, bills, rent, utilities, and other regular charges from your transaction history. The detection algorithm analyzes merchant-level transaction patterns to find recurring payments, then lets you confirm, dismiss, or manually add entries. Confirmed recurring charges integrate with the Budget page and are automatically tagged for easy filtering across the app.
Recurring is accessed via the Recurring Charges tab on the Budget page. The /recurring URL redirects to /budget. The Recurring Charges tab shows two sections: Manage (confirmed and manual entries) and Detected (auto-detected candidates).
Manage Section
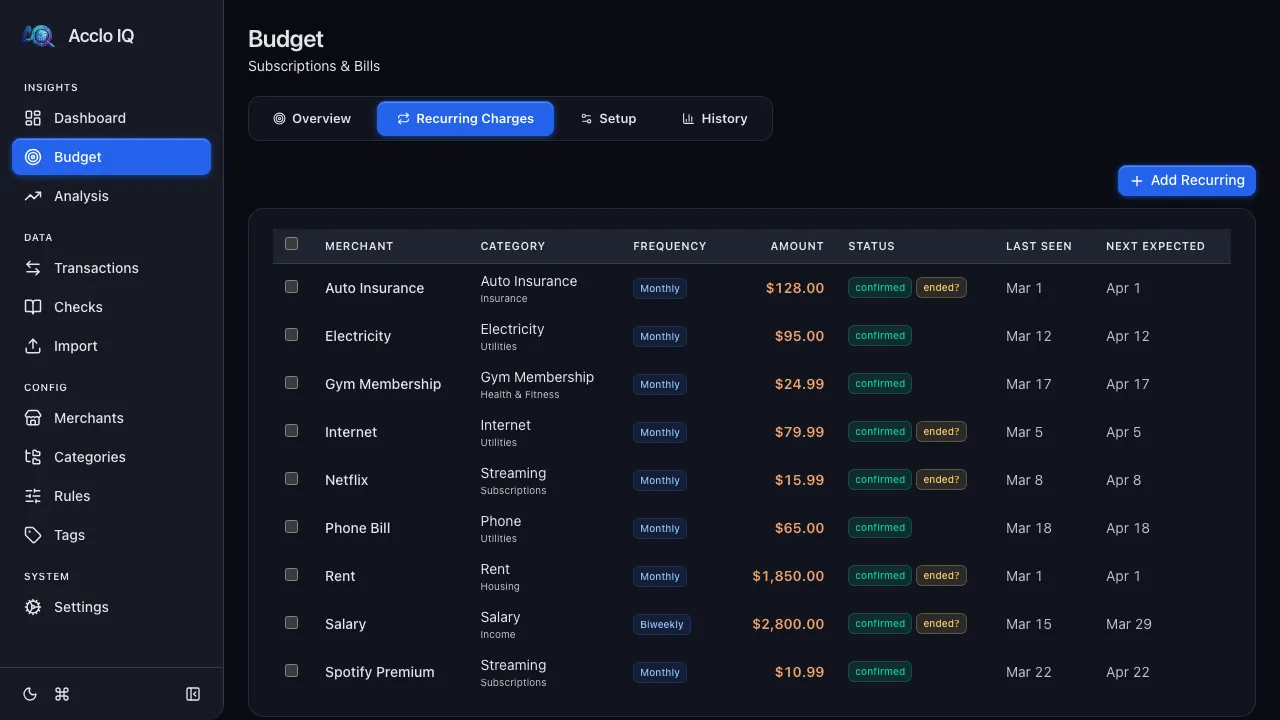
Section titled “Manage Section”The Manage section is the primary view on the Recurring Charges tab. It provides a full CRUD table for all confirmed and manually created recurring entries.
Entries Table
Section titled “Entries Table”A sortable table with the following columns:
| Column | Description |
|---|---|
| Checkbox | Select entries for bulk actions |
| Label | Display name of the recurring charge |
| Pattern | Description matching scope; shows “Any” badge when the entry matches all transactions from the merchant, or a monospace regex when it matches only specific descriptions |
| Category | Resolved category |
| Subcategory | Resolved subcategory |
| Frequency | Billing cycle (Weekly, Biweekly, Semi-monthly, Monthly, Quarterly, Yearly) |
| Amount | Expected charge amount |
| Status | Confirmed or Manual |
| Last Seen | Date of the most recent matching transaction |
| Next Expected | Computed next expected charge date |
Click any row to open the detail panel.
Add Recurring (Manual)
Section titled “Add Recurring (Manual)”Click the Add Recurring button to create an entry manually. The detail panel opens in create mode with fields for:
- Label — a descriptive name (e.g. “Netflix”, “Gym membership”)
- Frequency — billing cycle dropdown
- Expected Amount — the charge amount
- Description Pattern — optional regex to scope the entry to specific transaction descriptions (see Description Pattern below)
- Start Date — the anchor date used to calculate the next expected charge
Manual entries receive a status of “manual” and behave identically to confirmed entries for tagging and budget integration.
Detail Panel
Section titled “Detail Panel”Clicking an existing entry opens the detail panel in edit mode. Editable fields include Label, Frequency, Expected Amount, and Description Pattern. The panel also shows read-only schedule information:
- Last Seen date
- Next Expected date
- Anchor Date
- Merchant, Pattern (when non-null), Category, and Account (when available)
The panel footer follows the standard layout: Delete on the left, Cancel and Save on the right.
Bulk Delete
Section titled “Bulk Delete”Select multiple entries using the checkboxes, then use the bulk action bar to delete them. A confirmation dialog appears before deletion.
Detected Section
Section titled “Detected Section”The Detected section appears below the Manage table when auto-detected recurring candidates are available that have not yet been confirmed or dismissed.
How Detection Works
Section titled “How Detection Works”The algorithm groups transactions by merchant, then sub-groups by description similarity. This means a single merchant can produce multiple candidates if it has distinct charge types (see Description Pattern below for details). Each sub-group is analyzed independently for interval regularity, amount consistency, and recency. To qualify as a candidate, a group must have at least two transactions with a consistent billing pattern. Each candidate receives a confidence score, and candidates below 50% are filtered out.
Candidate Cards
Section titled “Candidate Cards”Each detected candidate displays:
- Merchant name
- Description pattern (when the candidate is scoped to specific descriptions, shown as monospace regex text below the merchant name)
- Frequency badge (Monthly, Quarterly, etc.)
- Confidence score as a percentage badge, color-coded by strength (green for 80%+, neutral for 60-79%, amber below 60%)
- Occurrence count and median amount per cycle
Confirm and Dismiss
Section titled “Confirm and Dismiss”Each candidate has two action buttons:
- Confirm — saves the candidate as a confirmed recurring entry, tags matching transactions with “Recurring” (all transactions if no pattern, or only pattern-matching transactions), and makes the entry appear in the Manage section
- Dismiss — hides the candidate from future detection results without confirming it. Dismissals are pattern-scoped: dismissing one pattern for a merchant does not affect other patterns for the same merchant. For example, dismissing “Amazon Marketplace” still allows “Amazon Prime” to be detected
Show Dismissed and Restore
Section titled “Show Dismissed and Restore”Click Show Dismissed at the bottom of the Detected section to reveal previously dismissed candidates. Each dismissed entry has a Restore button that deletes the dismissal record so the merchant can be detected again in the next scan.
Description Pattern
Section titled “Description Pattern”The description pattern controls which of a merchant’s transactions are considered part of a recurring entry. This is important when a single merchant has multiple distinct charge types, for example, Amazon may charge you for both a Prime subscription and one-off marketplace purchases.
How It Works
Section titled “How It Works”Each recurring entry has an optional description pattern:
- Blank (no pattern) — the entry matches every transaction from the merchant. This is the default and works well for merchants that only have one type of charge (e.g., Netflix, Spotify, your gym).
- Regex pattern — the entry only matches transactions whose description matches the regular expression. This lets you isolate a specific charge type from a merchant with mixed transactions.
The pattern is a case-insensitive regular expression tested against the transaction description field.
Example: Separating Amazon Charges
Section titled “Example: Separating Amazon Charges”Amazon transactions might include descriptions like “AMAZON PRIME MEMBERSHIP,” “AMAZON MARKETPLACE 8K2J4,” and “AMAZON FRESH DELIVERY.” The detection algorithm automatically groups these into separate candidates:
- Amazon Prime with pattern
AMAZON\s+PRIME.*— matches only the subscription charges - Amazon Marketplace — likely rejected due to irregular intervals and variable amounts
- Amazon Fresh with pattern
AMAZON\s+FRESH.*— matches only the delivery charges
You can confirm Amazon Prime as recurring without also treating marketplace purchases as recurring. Each is handled independently.
Using Patterns in the Detail Panel
Section titled “Using Patterns in the Detail Panel”The Description Pattern field appears in the detail panel for both new manual entries and existing entries:
- Leave blank to match any transaction from the merchant (shown as “Any” badge in the table)
- Enter a regex to scope the entry to specific descriptions (e.g.,
AMAZON\s+PRIME.*) - The field validates your regex on blur; if the pattern is invalid, an error message appears and saving is disabled
- The placeholder text shows an example:
e.g. AMAZON\s+PRIME.*
Pattern and Tagging
Section titled “Pattern and Tagging”The description pattern directly controls which transactions receive the “Recurring” tag:
- An entry with no pattern tags all of the merchant’s transactions
- An entry with a regex pattern only tags transactions whose description matches
This means you can have one Amazon entry for Prime (tagged as recurring) while marketplace purchases remain untagged and are treated as discretionary spending in the budget.
Pattern and Dismissals
Section titled “Pattern and Dismissals”When you dismiss a detected candidate, the pattern is stored with the dismissal. This means dismissing one pattern for a merchant does not dismiss other patterns. If you dismiss “Amazon Marketplace” but later the algorithm detects “Amazon Prime” as a separate candidate, it will still appear in the Detected section.
Budget Integration
Section titled “Budget Integration”Recurring data appears in two places on the Budget page’s other tabs when you have confirmed recurring entries.
Overview Tab — Stacked Progress Bars
Section titled “Overview Tab — Stacked Progress Bars”Budget category rows show a stacked progress bar that splits spending into two segments:
- Recurring segment (accent color) — actual spending on transactions tagged as Recurring within that category
- Flex segment (standard color) — all other (discretionary) spending in the category
Below the bar, a summary line shows the recurring and flex amounts separately (e.g. “$45/$60 recurring · $120/$140 flex”).
A Committed Recurring KPI card shows the total monthly recurring commitment and what percentage of your total budget it represents. A Recurring Status card shows paid vs pending charges for the current month; clicking it navigates to the Recurring Charges tab.
Setup Tab — Recurring Floor
Section titled “Setup Tab — Recurring Floor”Each category row on the Setup tab shows a thin bar indicating how much of the budget is committed to recurring charges versus how much is available for flexible spending. If the recurring commitment exceeds the budget amount, the bar turns red and a warning message appears: “Budget is below recurring commitment.”
The sidebar summary includes a recurring vs flex breakdown showing the total recurring amount, its percentage of the overall budget, and the remaining flex allowance.
The “Recurring” Tag
Section titled “The “Recurring” Tag”Acclo IQ maintains a system tag called Recurring (displayed in amber). This tag is automatically applied to transactions that belong to a confirmed or manually added recurring merchant. The tag cannot be deleted or renamed, though its color can be customized.
Tag Behavior
Section titled “Tag Behavior”| Action | Effect on Tags |
|---|---|
| Confirm a candidate | Tag added to matching transactions (all if no pattern, or only description-matching if regex pattern) |
| Create a manual entry | Tag added to matching transactions (all if no pattern, or only description-matching if regex pattern) |
| Deactivate an entry | Existing tags preserved; new imports will not be tagged |
| Dismiss a candidate | Tags removed from the merchant’s matching transactions |
| Delete an entry | Tags removed from the merchant’s matching transactions |
New transactions imported via CSV or bank sync are automatically tagged if they match an active recurring entry’s merchant and description pattern.
The Recurring tag allows you to filter for recurring transactions on the Transactions page, and it powers the recurring vs flex split on the Budget page.
Free vs Pro
Section titled “Free vs Pro”| Capability | Free | Pro |
|---|---|---|
| Detection and confirmation | Yes (12-month lookback) | Yes (unlimited lookback) |
| Manage section (CRUD) | Yes | Yes |
| Upcoming forecast | No | Yes |
| Budget integration | No | Yes |
Related Guides
Section titled “Related Guides”- Budgets — see how recurring data integrates with budget tracking
- Transactions — filter and view transactions tagged as Recurring
- Merchants — recurring detection is merchant-based
- Tags — manage and filter by the system Recurring tag